Proper preparation, selecting suitable materials, and clear planning are essential for tiling a bathroom in Wolverhampton. Begin with thorough waterproofing, then carefully plan the tile layout before installation. Select the right adhesive for your chosen tiles, maintain even spacing during placement, grout meticulously, and ensure all surfaces are well-sealed.
Key steps at a glance:
- Waterproof with a tanking system (required under BS 5385-1)
- Plan your layout to avoid awkward cuts.
- Use the correct tile adhesive for wall or floor tiles.
- Space tiles evenly with tile spacers
- Grout and seal once the adhesive has fully cured.
Whether you are tackling a small shower enclosure or a full bathroom renovation, this guide covers everything you need to know. From tile types and tools to step-by-step installation and 2026 costs in Wolverhampton.
Get a free quote from trusted local tilers in Wolverhampton.
Introduction to Bathroom Tiling for Wolverhampton Homeowners
Bathroom tiling is a crucial method to shield your home from moisture while increasing its value. In Wolverhampton, where many terraced and semi-detached houses are older, bathrooms frequently require updates to meet modern waterproofing standards.
Tiles guard walls and floors from steam, splashes, and daily humidity. Without them, surfaces deteriorate rapidly. Damp can infiltrate structural components and neighboring rooms, turning minor bathroom issues into expensive repairs.
The question many homeowners ask is whether to go DIY or hire a professional. Both are valid options depending on your experience and the complexity of the job. This guide gives you the knowledge to make that decision with confidence.
Types of Bathroom Tiles (UK Market Explained)
Selecting the right tile for your bathroom is a critical choice in any renovation. Not all tiles are suitable for wet areas, and an improper selection can lead to cracking, slips, or water infiltration.
Ceramic vs Porcelain Tiles
Ceramic and porcelain are the two most popular tile choices in UK bathrooms. Here is how they compare:
| Feature | Ceramic Tiles | Porcelain Tiles |
| Cost (supply only) | £10 to £30 per m² | £20 to £60 per m² |
| Water absorption | Moderate | Very low |
| Durability | Good | Excellent |
| Best for | Wall tiling | Floors and wet rooms |
| Ease of cutting | Easy | Requires wet cutter |
| Weight | Lighter | Heavier |
Porcelain tiles generally cost more per square foot than ceramic tiles. Mosaic tiles often require more labor to install due to their small size and intricate placement, thereby increasing overall installation costs.
Ceramic tiles work well on bathroom walls. They are lightweight, easy to cut, and come in a huge range of styles. Porcelain is denser, nearly nonporous, and much more moisture-resistant. It is the better choice for bathroom floors and shower enclosures.
Natural Stone Tiles (Marble, Slate)
Natural stone, such as marble and slate, lends an upscale appearance to any bathroom. However, it requires sealing to prevent water absorption and staining. It is also heavier than ceramic or porcelain, so walls and floors must be adequately reinforced to support the weight.
Natural stone is better suited to low-traffic bathrooms or feature walls rather than shower floors, where slip resistance is essential.
Mosaic and Feature Tiles
Mosaic tiles are small tiles, often glass or ceramic, arranged in sheets. They are popular for shower floors because the high number of grout lines improves grip. They are also used as feature strips, niche linings, or splash-backs to add personality to a neutral scheme.
Note that mosaic tiles demand extra grouting, increasing labor costs.
Best Tiles for Wolverhampton Homes
For most Wolverhampton bathrooms, porcelain tiles on the floor and ceramic or porcelain on the walls strike the best balance of cost and performance. Mid-range porcelain in neutral tones tends to hold its value well and suits both period terraces and modern builds.

Tools and Materials Needed for Bathroom Tiling
Before starting, confirm that every item on this checklist is ready. Missing even a single required tool or material can result in expensive delays.
Essential tools:
- Electric tile cutter or manual tile scorer
- Notched trowel for applying adhesive
- Spirit level
- Rubber mallet
- Tile spacers (2mm to 5mm, depending on tile size)
- Grout float
- Sponge and bucket
- Measuring tape and pencil
- Mixing paddle and bucket
Materials you will need:
- Tiles (buy 10 to 15% extra for cuts and breakages)
- Tile adhesive (flexible, waterproof type for wet areas)
- Grout (floor grout for floors, wall grout for walls)
- Tanking membrane or tile backer board
- Silicone sealant for joints and corners
- Tile primer (if tiling over a porous surface)
Choose adhesive carefully. In wet areas such as showers and around baths, you need a flexible, waterproof adhesive that complies with UK standards. Standard white tile adhesive is not suitable for permanently wet zones.
Bathroom Tiling Preparation: The Most Important Step
Skipping preparation is the number one reason bathroom tiling jobs fail. No matter how well you lay the tiles, if the surface underneath is wrong, problems will follow.
Surface Preparation
Walls must be solid, clean, flat, and dry. Remove any old paint, loose plaster, or existing tiles that are not firmly bonded. Fill any cracks or holes and allow filler to cure fully before tiling.
Floors must be level. A variation of more than 3mm under a 2-meter straight edge (SR1 surface regularity to BS 5385) will cause tiles to crack over time. Use a self-leveling compound to correct any unevenness before you begin.
Waterproofing: The Tanking System UK Standard
This step is non-negotiable. Under the British Standards Institute (BSI) BS 5385-1:2018 clause 6.1.1.3, all substrates within a wet area should now be waterproofed before tiling, even in domestic locations.
Tiles alone are not enough to prevent water from reaching the substrate. It is a common misconception that cementitious adhesives and grouts are waterproof. Most are only water-resistant.
You have three main options for waterproofing:
- Liquid tanking membrane: Painted onto surfaces before tiling. Fast and effective.
- Tanking tape-and-paste kit: Tape is applied to joints and corners, then paste is applied over the surface.
- Tile backer boards: Waterproof cement boards that replace plasterboard in wet zones.
Waterproofing in wet areas adds £200-£400 to a bathroom project but can save much more in the long term on repairs.
Always tank the full shower enclosure, the area around the bath, and the floor. Even if you are only retiling, do not skip this step.
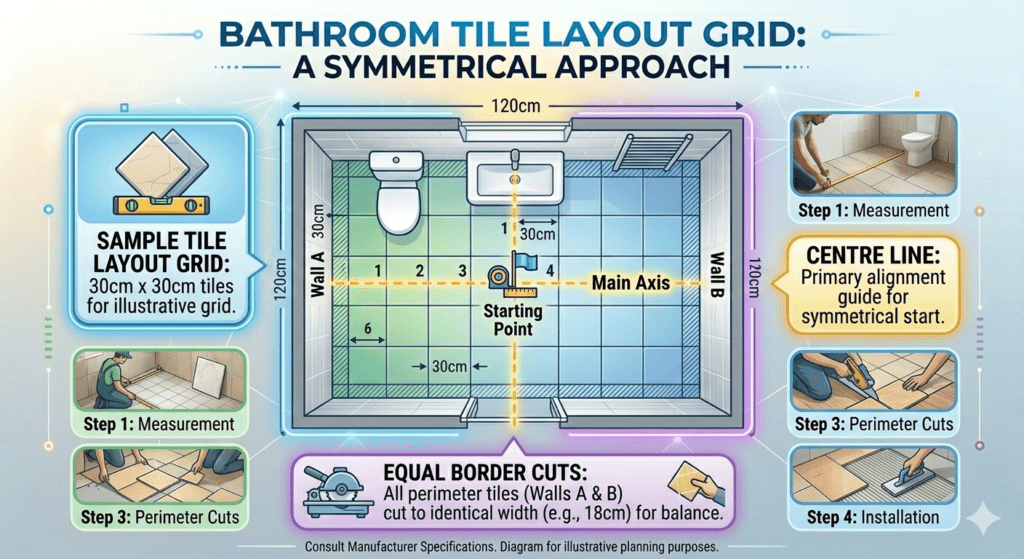
Layout Planning
Planning your tile layout before you start prevents expensive mistakes. Find the centre point of each wall and work outward. This ensures cuts at the edges are equal on both sides and the layout looks balanced.
Avoid ending up with tiny cuts in corners or around fixtures. If a planned layout creates cuts smaller than half a tile, shift your starting point slightly. Use a chalk line or laser level to keep rows perfectly straight.
Step-by-Step Bathroom Tiling Guide
This is the core of your project. Follow each step in order and do not rush.
Step 1: Measure and Plan Your Layout
Measure the total area to be tiled in square metres. Add 10-15% for cuts and waste. Mark your centre lines on the wall or floor using a pencil and spirit level. Dry-lay a row of tiles from the centre outward to visualise the final layout before you commit.
Step 2: Apply Tile Adhesive
Mix adhesive to a smooth, lump-free consistency. Use a notched trowel held at a 45-degree angle to spread adhesive evenly across a 1-square-metre section at a time. Work in small sections so the adhesive does not skin over before the tiles go on.
For large-format tiles, back-butter each tile (spread adhesive on the back and the wall) to ensure full coverage and a solid bond.
Step 3: Lay Tiles with Spacers
Press each tile firmly into the adhesive with a slight twisting motion. Use a rubber mallet to tap tiles flush. Place tile spacers at every corner to maintain even grout joints.
Check regularly with a spirit level, both vertically and horizontally. Adjust while the adhesive is still workable. Once a section is done, stand back and check for alignment before moving on.
Step 4: Cut Tiles Accurately
Measure each cut carefully before scoring or cutting. For straight cuts on ceramic tiles, a manual tile cutter works well. For porcelain or angled cuts, an electric wet tile saw gives cleaner, more precise results.
Always wear eye protection when cutting tiles. Smooth cut edges with a tile file before installation to remove sharp edges.
Step 5: Grouting
Leave tiles for at least 24 hours after laying before grouting. For rapid-set adhesive, 12 hours may be enough. Check the adhesive manufacturer’s guidance.
Mix grout to a smooth, creamy consistency. Apply with a rubber grout float, pressing grout firmly into the joints at a diagonal angle. Remove excess grout with a damp sponge before it dries on the tile face. Rinse the sponge frequently.
Step 6: Sealing and Finishing
Once grout has cured (typically 24 to 48 hours), apply grout sealer to protect against staining and moisture penetration. Run a bead of flexible silicone sealant along all internal corners and the joint where wall tiles meet floor tiles. This prevents water from tracking into the substrate at the most vulnerable points.
Do not use grout in corners. Grout is rigid and will crack under normal building movement. Silicone is flexible and remains watertight.
Explore our full bathroom renovation services in Wolverhampton
Bathroom Wall Tiling vs Floor Tiling: Key Differences
Wall tiling and floor tiling are not the same job. The materials and methods differ in important ways.
| Factor | Wall Tiling | Floor Tiling |
| Adhesive type | Standard or rapid-set | Heavy-duty, flexible |
| Tile weight limit | Lower | Higher |
| Slip resistance needed | No | Yes |
| Typical tile size | 300x600mm to 600x600mm | 300x300mm to 600x600mm |
| Grout type | Standard wall grout | Floor-rated grout |
Wall adhesive is not designed to bear the weight of floor tiles. Using the wrong adhesive risks tiles cracking, sliding, or de-bonding over time. Always use a floor-rated adhesive on floors and a slip-resistant tile finish in wet floor areas.
Bathroom Tiling Cost in Wolverhampton (2026 Updated)
Understanding the costs involved helps you budget accurately and avoid surprises. Costs in the West Midlands are generally lower than in London and the South East, which works in your favor.
What to Expect to Pay
Most homeowners pay £500-£800 to tile a bathroom in the UK, depending on the tile type, the area being tiled, and the amount of preparation work required. Labour costs around £20 to £40 per m², and a standard bathroom tiling job usually takes 2 to 4 days.
To fully tile the walls and floor of a bathroom, expect to pay between £800 and £1,200. The average cost of tiling in the UK sits around £110 per m², including standard tiles, materials, and labour.
For Wolverhampton specifically, labour rates tend to sit at the lower end of the national range. Budget approximately £480-£1,350 for most standard bathroom tiling projects.
Cost Breakdown Table
| Item | Estimated Cost |
| Ceramic wall tiles (supply) | £10 to £30 per m² |
| Porcelain floor tiles (supply) | £20 to £60 per m² |
| Labour (wall tiling) | £20 to £40 per m² |
| Labour (floor tiling) | £20 to £35 per m² |
| Tanking and waterproofing | £200 to £400 |
| Grout and adhesive | £50 to £120 |
| Tile backer boards | £15 to £30 per m² |
| Tile removal (if needed) | £150 to £300 |
In the UK, labour costs typically range from £20 to £40 per m² for straightforward projects. More complex jobs, like those involving natural stone or bespoke designs, might increase the rate to £30 to £60 per m².
Cost Saving Tips
- Buy tiles yourself from a tile supplier rather than through a tradesperson, and save 10-20% on markups.
- Choose ceramic tiles over natural stone for a similar look at a much lower price.
- Stick to a simple square or rectangular layout to reduce labour time.
- Get at least three quotes from local Wolverhampton tilers before committing.
- Do the tile removal yourself to cut labour costs significantly.

Common Bathroom Tiling Mistakes to Avoid
Even experienced DIYers make these mistakes. Knowing them in advance saves time and money.
Poor surface preparation. Tiling over damp, uneven, or unsound surfaces is the most common cause of tiles cracking or falling off.
Skipping waterproofing. Many homeowners skip tanking to save money. This leads to damp, mould, and structural damage that costs far more to fix later.
Wrong adhesive. Using standard white adhesive in a shower or wet room will fail. Always use a flexible, waterproof adhesive in wet zones.
Uneven tile spacing. Not using spacers or removing them too early leads to uneven grout joints that are very visible once finished.
Grouting corners. Corners must be sealed with flexible silicone, not grout. Grout cracks under movement, letting water in.
Not buying enough tiles. Always buy 10 to 15% more tiles than your measured area to allow for cuts, breakages, and future repairs.
Starting in the wrong place. Tiles laid from a corner rather than the centre often look off-balance, with small awkward cuts on one side.
Can You Tile Over Existing Tiles?
Yes, in some cases. But it comes with real risks and is not always the best approach.
Tiling over existing tiles works only if the original tiles are firmly bonded, the surface is flat, and the added weight does not exceed the substrate’s capacity. You also need to check that adding another tile layer will not affect door frames, bath panels, or skirting boards.
The risks include: extra weight causing the original tiles to debond, reduced room dimensions in tight spaces, and difficulty achieving a flat surface if the original tiles are uneven.
For older Wolverhampton homes with plaster walls, it is usually better to remove the original tiles and start fresh. This gives you the opportunity to inspect the substrate, apply a tanking system, and ensure a long-lasting result.
If you are unsure, a professional tiler can assess the existing tiles and provide honest advice.
How Long Does Bathroom Tiling Take?
Timelines vary depending on the size and complexity of the job.
Small jobs (around a shower enclosure or splashback): 1-2 days.
Standard bathroom (walls and floor): 3 to 4 days, including prep, tiling, grouting, and finishing.
Full renovation (stripping out, tanking, tiling, and sealing): 7 to 10 days.
On average, a tiler can usually complete 10 to 15 m² of wall tiles or 8 to 12 m² of floor tiles per day.
Complex patterns such as herringbone or diagonal layouts take significantly longer. Factor in drying and curing times when planning your schedule. The bathroom will need to be out of use for at least 24 to 48 hours after grouting is complete.
DIY vs Hiring a Professional Tiler in Wolverhampton
When DIY Works
DIY tiling makes sense if you have some home improvement experience, the job is small and straightforward, and you have access to the right tools. Tiling a splashback above a sink or a small shower enclosure is manageable for a confident DIYer who takes time to plan properly.
The main saving with DIY is on labour costs, which typically make up 40 to 60% of the total bill.
When to Hire Experts
For larger jobs, full bathroom renovations, wet rooms, or any tiling on timber floors, hiring a professional is the safer choice. Professional tilers understand how to apply tanking systems correctly, handle complex cuts around pipework and fixtures, and ensure the job meets BS 5385 standards.
Mistakes made by an inexperienced DIYer can be costly to fix. De-bonded tiles, cracked grout, and water ingress are all common outcomes of poorly executed tiling.
A local Wolverhampton tiler also brings knowledge of the specific housing types and substrate challenges common in the area, from Victorian-era solid walls to modern plasterboard partitions.
Find trusted tilers and bathroom specialists in Wolverhampton.
Bathroom Tiling Design Ideas (UK Trends 2026)
Bathroom design in 2026 is firmly focused on warmth, texture, and a spa-like feel. These are the trends that Wolverhampton homeowners are choosing right now.
Large format tiles. Large format tiles are a continued favourite for 2026, offering a minimalist, seamless look. With fewer grout lines, these tiles create a clean, contemporary feel that is perfect for both modern and traditional bathrooms.
Warmer tones replacing grey. Grey had a long run. In 2026, the spotlight has moved towards warmer, earthier tones: soft sand, oat, putty, biscuit, clay, terracotta, warm taupe, and muted greens.
Minimal grout lines. Large-format tiles with rectified straight edges require a thinner grout line of 2 to 3mm. By coordinating grout colour, you can achieve a stunningly simple design.
Wet room tiling. Open, barrier-free shower areas with floor-to-ceiling tiles are becoming increasingly popular. They look premium and are easier to clean than traditional shower trays.
Textured and ribbed tiles. Matt, ribbed, or fluted tiles add depth and visual interest without the need for bold colour or pattern.
Tile drenching. Using the same tile on both walls and floor for a seamless, wrapped-in-stone effect. Pair with matching grout for maximum impact.
Bathroom Tile Maintenance and Cleaning Tips
A well-tiled bathroom should last 20 to 30 years with proper care. Here is how to protect your investment.
Prevent mould growth. Ventilate your bathroom well after every shower. A quality extractor fan helps to reduce humidity and prevents mould from forming on grout.
Clean grout regularly. Grout absorbs dirt and moisture over time. A mild bicarbonate of soda paste applied with an old toothbrush keeps grout lines clean and bright.
Reseal grout annually. Apply a grout sealer once a year in shower areas to maintain moisture resistance and reduce staining.
Check silicone joints. Inspect the silicone at wall and floor joints every 12 months. If it shows cracking, mould, or separation, remove it fully and reapply. Do not seal over old silicone.
Regrouting worn tiles. If grout becomes crumbling or discoloured but tiles are still in good condition, regrouting alone can transform the look of a bathroom without the cost of full retiling. Use a grout rake to remove old grout before applying fresh grout.
Avoid using harsh bleach-based cleaners directly on natural stone or coloured grout as they can cause fading and surface damage.
Frequently Asked Questions: Bathroom Tiling in the UK
What is the best tile for bathrooms in the UK?
Porcelain tiles are the top choice for UK bathrooms. They have very low water absorption, excellent durability, and are available in a wide range of styles. Ceramic tiles are a cost-effective alternative for walls. Both perform well in the damp conditions typical of UK bathrooms, especially with a proper tanking system in place.
Do you need to waterproof a bathroom before tiling?
Yes. Under BS 5385-1:2018, all substrates in wet areas must be waterproofed with a suitable tanking system before tiling. Tiles and grout alone are not waterproof. Without tanking, water penetrates grout joints over time, causing dampness, mould, and structural damage that is expensive to repair.
How much does bathroom tiling cost in Wolverhampton in 2026?
Most homeowners in Wolverhampton pay between £480 and £1,350 to tile a bathroom, depending on size, tile choice, and complexity. Labour runs at approximately £20 to £40 per m², and tiles cost from £10 per m² for ceramic to £60 per m² for premium porcelain. Always get three quotes from local tilers.
Can I tile a bathroom myself?
Yes, if the job is small and you have basic DIY experience. Splashbacks and small wall areas are achievable for a careful DIYer. However, full bathroom tiling, wet rooms, and timber floors are better left to professionals. Errors in waterproofing or adhesive selection can lead to costly repairs that far exceed the money saved on labour.
How long do bathroom tiles last?
Good quality tiles installed correctly last 20 to 30 years or more. The tiles themselves rarely fail. Grout and silicone are the weak points and need periodic maintenance. Regular resealing, good ventilation, and prompt repair of any cracked grout or silicone will keep a tiled bathroom in excellent condition for decades.
Final Thoughts: Getting Your Bathroom Tiling Right in Wolverhampton
A well-done bathroom tiling job adds real value to your home and protects it from costly moisture damage for years to come. The key is thorough preparation, correct waterproofing, and choosing the right tiles and adhesive for the job.
Whether you decide to tile yourself or hire a professional in Wolverhampton, this guide provides everything you need to make informed decisions and avoid the most common mistakes.
Take the time to plan your layout, invest in proper waterproofing, and avoid cutting corners on materials. The result will be a bathroom that looks great and lasts.
Get in touch with our trusted bathroom specialists in Wolverhampton today.